


Bricktronics Megashield Design
Parts of the Bricktronics Megashield (and Arduino Mega)
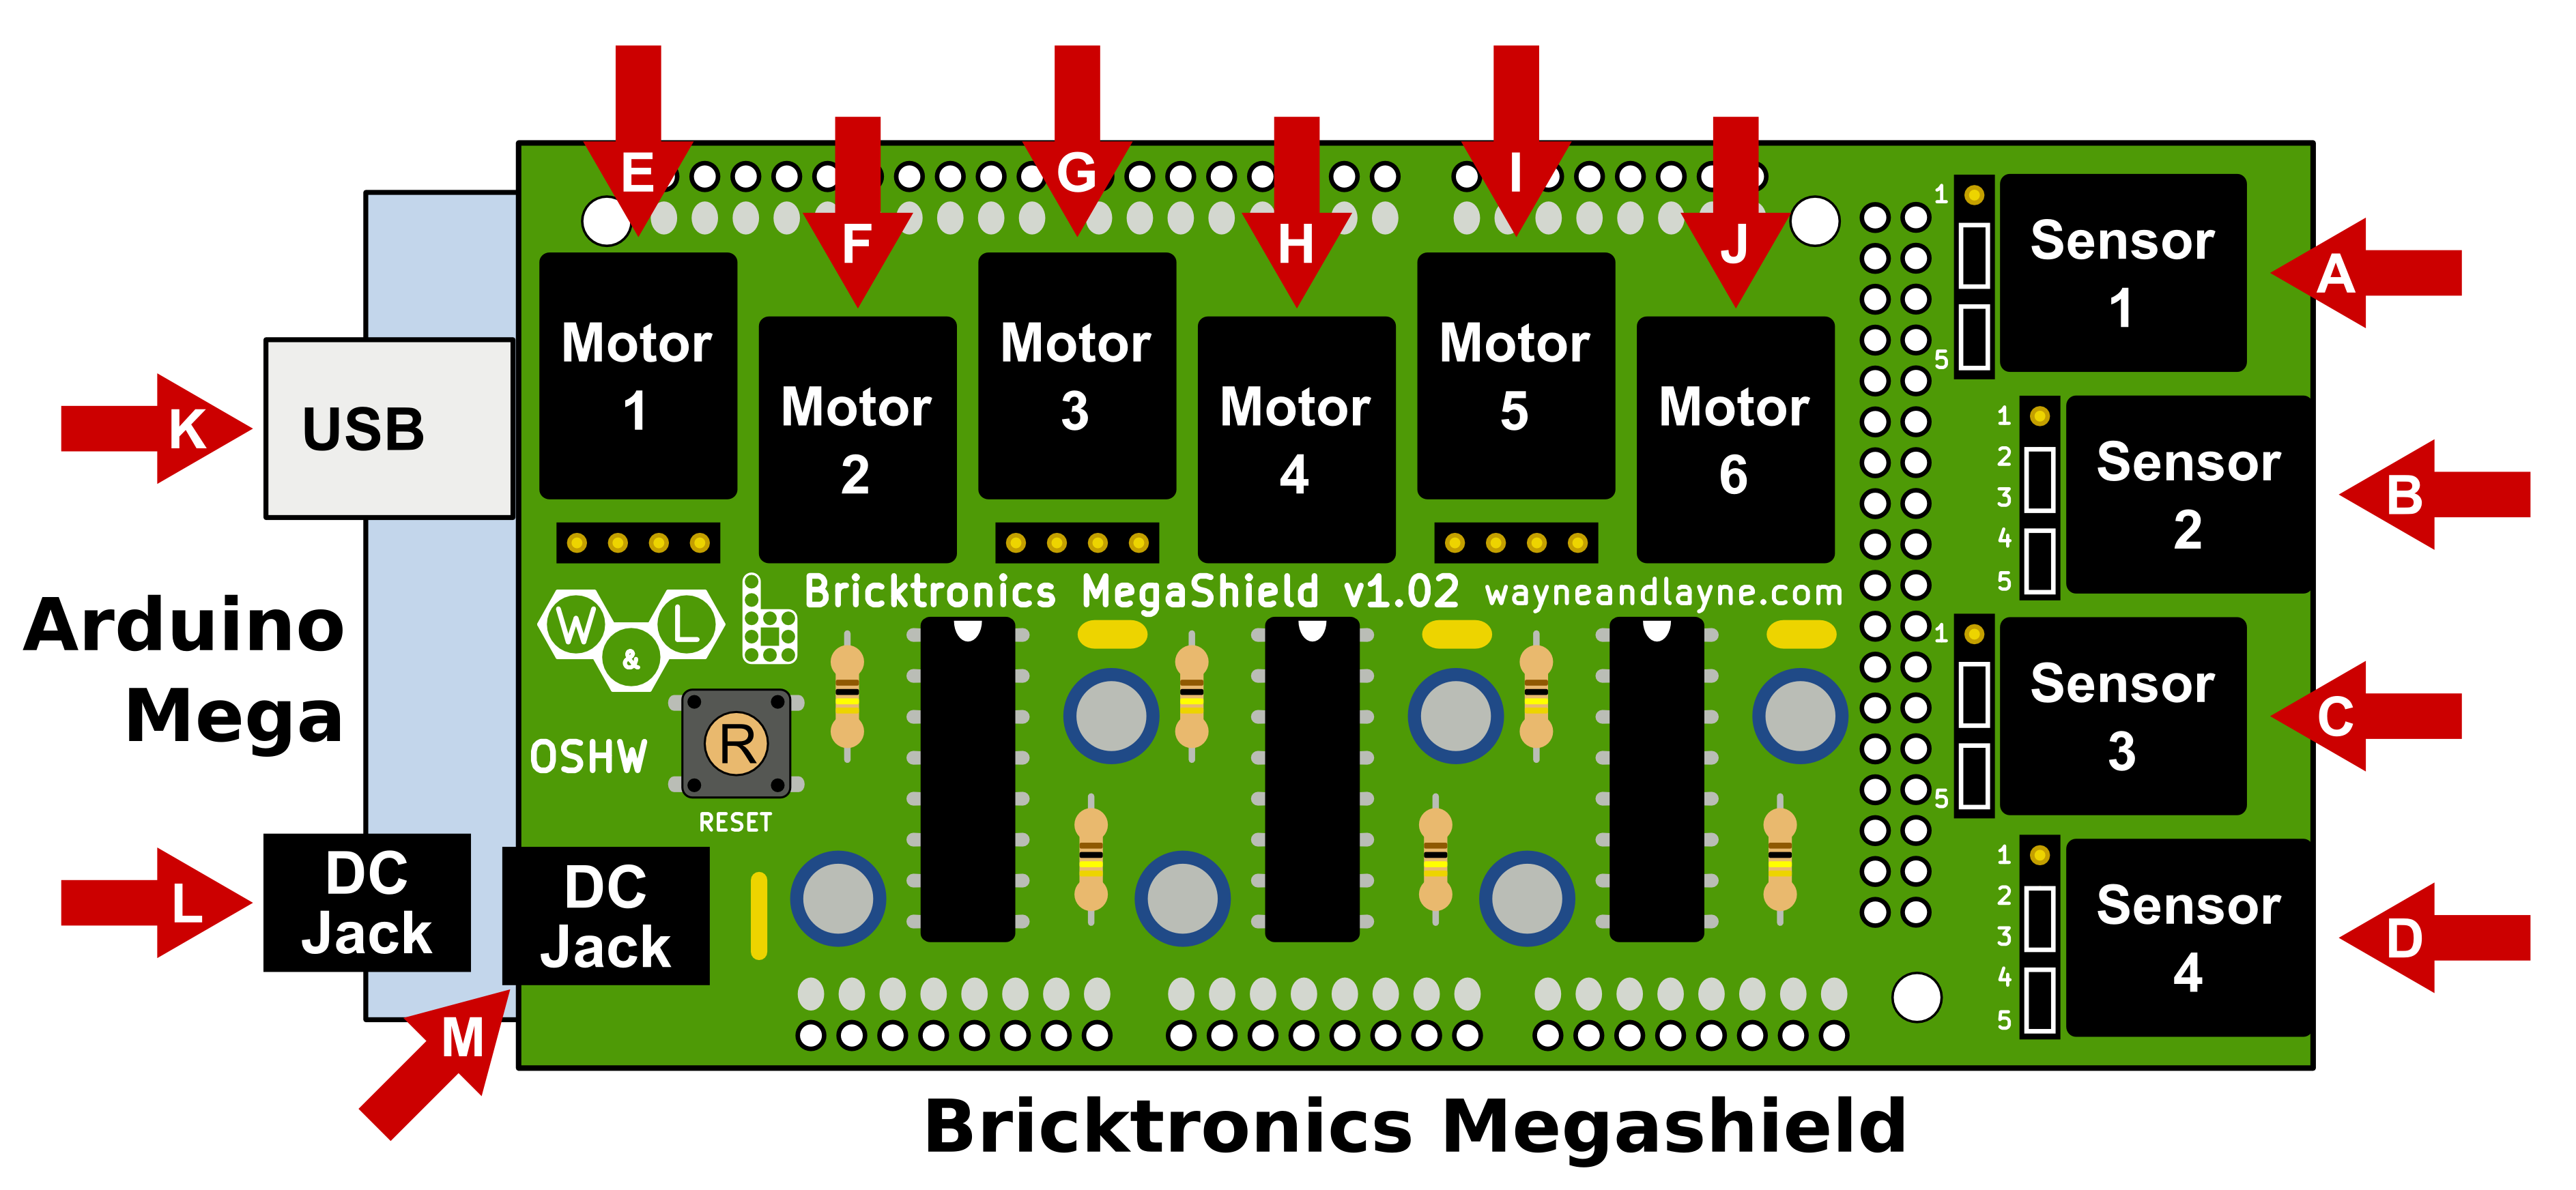
Sensor Ports (A, B, C, D)
The Sensor Ports connect NXT sensors to the Arduino. Because many sensors are wired differently, you need to use the jumpers and 5-pin headers to make the correct connections depending on the sensor type. More details are available on the Bricktronics Sensors page.
Motor Ports (E, F, G, H, I, J)
Each Motor Port can drive an NXT Motor and monitor its position using the built-in encoders.
Motor Headers (The 4-pin header strips behind three of the motor ports)
Three of the Motor Ports have a Motor Header for driving other motors, such as the LEGO Power Functions motors. The leftmost pin (pin 1) is tied to Vin (the motor voltage from the DC jack, the middle two are the motor driving outputs from the L293D, and the rightmost pin is ground.
Most people probably won’t use these, but we’ve provided it for maximum flexibility.
Do not put jumpers on these pins.
USB Port (K)
This is how the Arduino Mega gets reprogrammed, and if you’re not using the Ultrasonic sensor or any motors, the Arduino can get power from the USB port as well.
DC Jacks (L and M)
These jacks accepts a 5.5mm/2.1mm, center-positive DC plug (Arduino standard). For this shield, you want the output voltage of the power supply to be between 7.2 V and 9 V, in order to power the motors and sensors safely. If you’re not using motors or the ultrasonic sensor, you can skip this, and just power from the USB port.
Which DC Jack should I use? – It’s true, both DC jacks can supply the higher voltage (7.2-9 volts) needed to power the motors and Arduino. However, the only way this voltage is connected between the Arduino board and the Bricktronics Megashield is a single header pin, which can’t carry enough current to power lots of motors. This is why we included a DC jack on the Megashield itself, so you can provide the high current directly to the Megashield PCB itself, instead of going through that small header pin. You should always power the Megashield by connecting the DC power plug to the DC jack on the Megashield, never by using the jack on the Arduino itself.
Arduino Pins
The Bricktronics Megashield uses a lot of Arduino pins, but if you don’t use all the motors and sensors you can get away with reusing many of them. Here’s a pin mapping for the Bricktronics Megashield, but you can also refer to the circuit schematics for more details.
Bricktronics Megashield (all versions)
Pin	Function
0
1
2	Motor 2 encoder input 1
3	Motor 1 encoder input 1
4	Motor 6 PWM (speed)
5	Motor 5 PWM (speed)
6	Motor 4 PWM (speed)
7	Motor 3 encoder input 2
8	Motor 3 PWM (speed)
9	Motor 2 PWM (speed)
10	Motor 2 encoder input 2
11	Motor 1 PWM (speed)
12	Motor 1 encoder input 2
13
14	Motor 4 encoder input 2
15	Motor 5 encoder input 2
16	Motor 6 encoder input 2
17
18	Motor 3 encoder input 1
19	Motor 4 encoder input 1
20	Motor 5 encoder input 1
21	Motor 6 encoder input 1
22
23
24
25	Sensor 1 digital pin 1
26
27
28
29	Sensor 1 digital pin 2
30
31
32
33
34
35
36
37	Sensor 2 digital pin 1
38
39	Sensor 2 digital pin 2
40
41
42
43
44
45
46
47	Sensor 3 digital pin 1
48
49	Sensor 3 digital pin 2
50
51	Sensor 4 digital pin 1
52
53	Sensor 4 digital pin 2
A0	Motor 1 direction
A1	Motor 1 enable
A2	Motor 2 enable
A3	Motor 2 direction
A4	Motor 3 direction
A5	Motor 3 enable
A6	Motor 4 direction
A7	Motor 4 enable
A8	Motor 5 direciton
A9	Motor 5 enable
A10	Motor 6 direction
A11	Motor 6 enable
A12	Sensor 1 analog input
A13	Sensor 2 analog input
A14	Sensor 3 analog input
A15	Sensor 4 analog input
We also have a page on Bricktronics Library Design and Theory.