Hand Soldering SMT
This is an overview page on hand-soldering surface-mount components. It is part of our Surface-mount soldering may be easier than you think! series.
Hand soldering uses an iron, solder, soldering wick, and sometimes flux to attach surface mount components to a circuit board.
Tools
Temperature-controlled Soldering Iron
A $10 non-temperature controlled iron is not really a good iron to learn SMT soldering on. You don’t need an expensive iron, but you do need to be able to control the temperature.
One of the irons we like here at Wayne and Layne is the Weller WCL100. The knob goes from 0 to 5, instead of being directly temperature-controlled, but we’ve made a lot of good joints with that little guy. It’s relatively inexpensive, at around $50. It comes with an ST3 tip, which may be wider than you’re used to, but actually relatively useful for soldering. Many people may be more comfortable with ST7 or ST8.
Solder
For hand soldering SMT, we like to use 0.015″ 60/40 lead solder. Lead-free can be used if you need, and thicker solder may be useful for some techniques.
Solder wick
One thing we consider essential for hand soldering SMT is solder wick. This is also known as desoldering braid. It’s made of thin copper wires braided flat, and sometimes has flux in it. It helps remove solder.
Tweezers
Fine tipped tweezers are essential for moving and holding SMT components. We like the ones with the curved tip. You can get decent ones for approximately $6 from our website store.
Some people use vacuum pickup tools to pick up and place components. We don’t.
Flux
We don’t always use flux when hand soldering SMT boards, but some people swear by it. Flux is generally used with hand soldering SMT because thinner solder usually has less flux in it, and SMT solder joints are often heated more than once, so the little flux that was there to begin with has been used up.
Magnifier and Light
You’ll want plenty of light when soldering SMT, and you may want some magnification while working. There are good head visors with 2.5x magnification, like the OptiVisors, as well as lamps with built in magnifiers.
When you’re finished working,you may want something like a 10X loupe to check your work. There are even 10X loupes with built-in lighting!
Techniques
Removing Solder with Solder Wick
To use it, put the braid over the joint, and place your iron on top of the braid. The heat (and flux) pulls the solder into the braid. Use the end of the braid, and if it doesn’t seem to be working, first, cut off a small piece of braid from the spool and use that. Depending upon circumstances, the heat may travel up the braid instead of heating up the area on the joint. If the braid is old, the flux may not work. You can add flux to help supercharge the braid.

Soldering things like resistors and capacitors
Things like resistors and capacitors often come as little rectangles, where two opposite ends are the contacts. To hand solder these, add a little solder to one pad on the board. Use a tweezers to hold the component on the board, with one end on top of the solder. Touch the iron to the pin on the pad with the solder. The component should be firmly against the board, and both ends should be lined up with the pads. Add a little solder to the other end, creating a “fillet” between the pad and the component. Ideally, there isn’t a huge glob of solder at the end. If there is, use solder wick to remove the extra solder.
Soldering SOICs and other things with legs that stick out
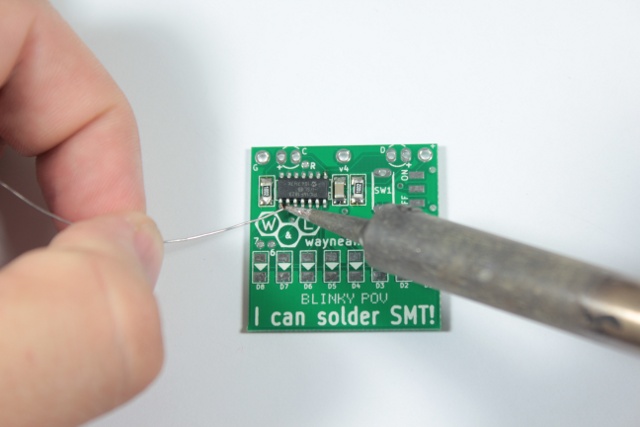
A common larger surface-mount chip package is the SOIC. This stands for “small-outline integrated circuit.” Add a little solder to one pad on the board. Use a tweezers to line up the chip with the pads on the board. Apply a little pressure with the tweezers, pushing the chip down onto the board, into the solder, and then touch the iron to the pin on the pad with the solder. The chip should be firmly against the board, and all the pins should be lined up with the pads. You can reheat the pad a few times to get the chip pushed down all the way and the pads lined up. Solder another pin on the other side to tack (or “lock”) the chip in place.

Solder the rest of the pins. When you’re finished, inspect the board. Fix any solder bridges. Small bridges can be fixed easily by just heating up the associated pins and “drawing” the solder out, and larger bridges can be fixed easily with solder wick.
Alternatively, if you don’t want to solder each pin one at a time, after you’ve tacked the chip in place, add plenty of solder to the pins and pads. Then, use solder wick to clean it up.

Drag Soldering
Drag soldering is another technique to solder many-pinned packages quickly. The idea is to tack the chip down, apply flux to the leads, and then drag a ball of solder across the pins. The solder will go where it needs to go.
We’ve found a quick video showing the basics of the technique.
There are more videos and tutorials available online. If you find one you really like, write about it in the forums or contact us and we’ll see about highlighting it here.


