


Bluetooth Keyboard Module, Part 1
 Adam and Matthew (Wayne and Layne) went to the same college and shared a dorm room for the first two years before moving off campus. During the first year, we had a Gauntlet arcade cabinet in our dorm room that we modded pretty heavily. We completely redid the control panel, adding cup holders and a bunch more buttons. We put a linux PC and modern display inside and played classic video games on emulators. Combined with a custom game launcher Matthew wrote, it was a great hit, especially with the RAs. There’s nothing like keeping your door open after quiet hours because your RA is too wrapped up trying to beat the original Legend of Zelda.
 The original control panel had leaf-style switch contacts, meaning that two flexible pieces of metal would be pressed together when a button was pushed or joystick moved. This was sloppy and starting to wear out, so we designed a new control panel that would use microswitch buttons and joysticks. The new control panel worked like a charm, and gave us many hours of Tetris, Zelda, and Super Mario Brothers.
Unfortunately, like all good things, the Gauntlet arcade machine had to come to an end. We had to get rid of the cabinet and sold it to a collector for restoration. We saved the custom built control panel for a future project, with a vague idea of building it into a coffee table to play games on the television.
…months pass…
The first step of this vague plan is to connect the buttons and joysticks to a computer. Ideally, it would be a wireless connection between the coffee table, maybe Bluetooth?
…years pass…
We discovered that a guy named Russ Nelson has been working on building a portable chorded keyboard using a bluetooth connection. He’s selling a bluetooth keyboard controller, the Blue Packet BP20422, based on the Broadcom BCM2042 chip. This would be perfect for connecting a bunch of arcade buttons and joysticks to a home theater PC.
 I purchased one of these modules and started building a breakout board for the funny 0.5mm pitch surface mount connections. The original breakout board is shown in the image at right. It just connected all the pins to a larger double row of standard 0.1″ pins. I was able to get the module powered and connected to my computer, but it wasn’t convenient to add other buttons or mount it to the control panel.
I created a custom PCB as an upgrade to the breakout board, that would include the handful of passive components required. I just got the PCBs back last week and finished soldering in the components and screw-down terminals. It’s powered by a pair of AA batteries, and handles its own power regulation.
 Using the keyboard matrix, I added wires and buttons to allow me to type in numbers. The bluetooth module does an excellent job of button debounce, and basically handles everything for you.
 I was even able to get it to pair up with my computer. Using the built-in Ubuntu bluetooth preferences window, I was able to identify the unit and check the “MAC Address” against the sticker on top of the chip. It then asks you to type in a numeric code and press enter, which I was able to do by pressing together the proper wires.
 After pairing the bluetooth module with my computer, it showed up as a keyboard and could enter text. Very cool!
What do you think? Would anyone be interested in purchasing a kit to connect any buttons or switches into a wireless bluetooth keyboard? Leave a comment below or Contact us.
Design files: Here are the design files (both gerbers and Kicad files) for this breakout board. The only parts that might be trickier to source are the 6 mm pushbutton switch, the 22 uF capacitor, and the 68 uF electrolytic capacitors.
Update: Here’s a PNG image of the schematic to answer a comment’s question about the row/col hookups. Click to enlarge.
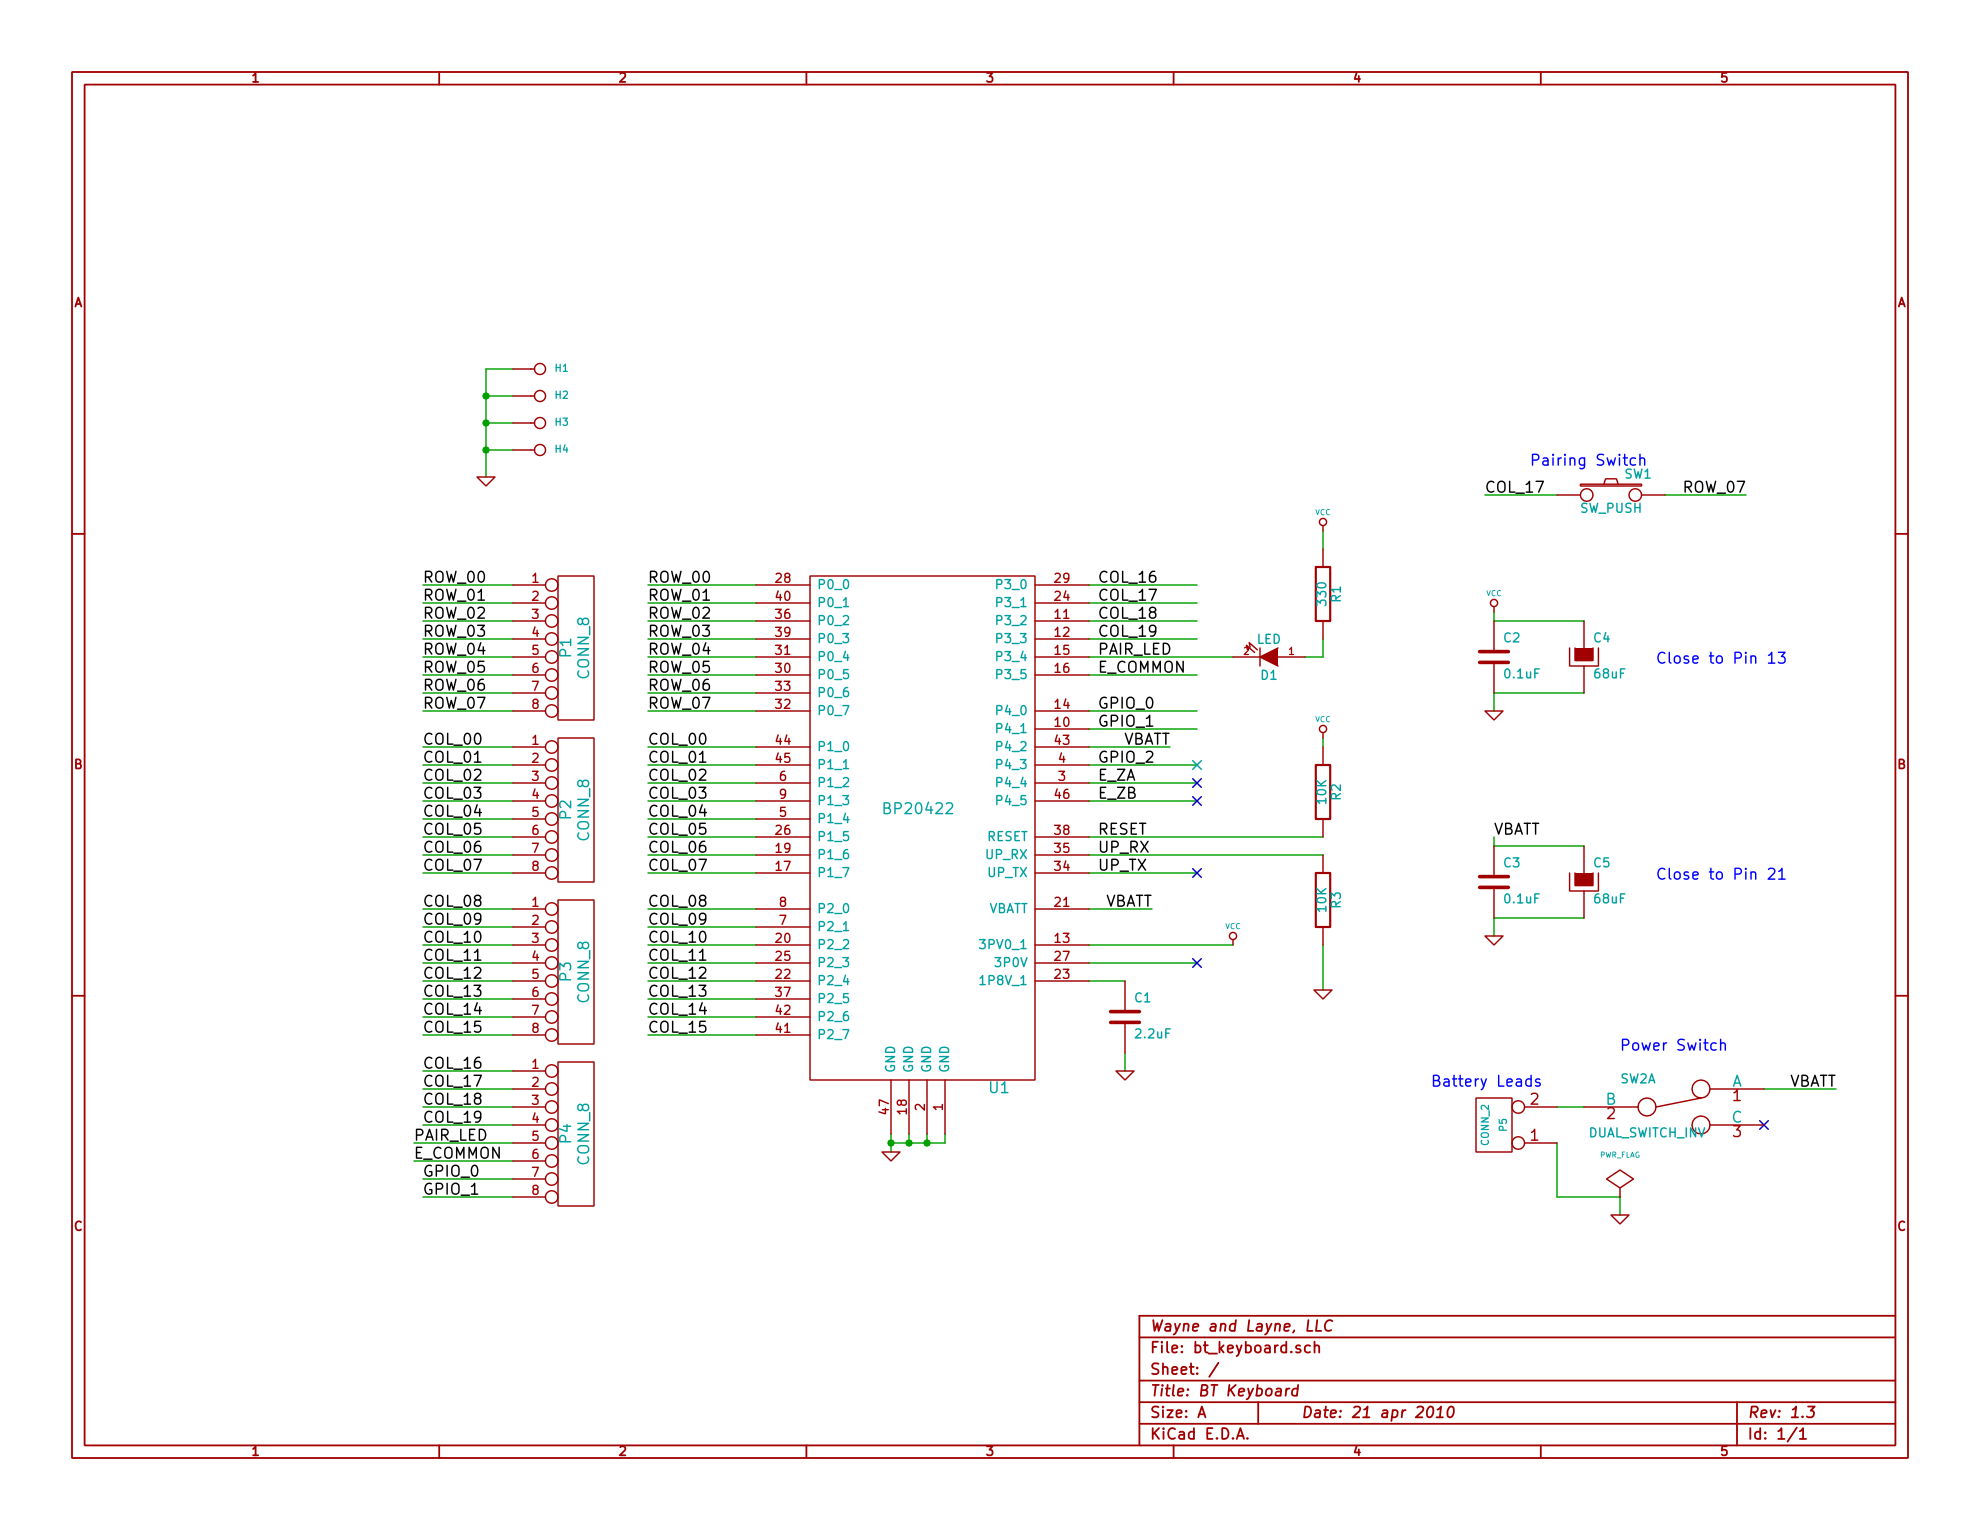
Great post. Very useful details. So, did you manage to power the BP20422 without the passive components, e.g., the caps, resistors, etc.? If so, why did you still need them in the end?
Ah, it might be unclear from my writeup, but with the original breakout board I still had to add in a couple resistors and caps, they just were hanging out in free-space around the breakout board, instead of being nicely integrated on a pcb. So yeah, the passives are required, I just wasn’t very clear about that, thanks for the note!
I’d be interested in a kit to do just this. Any chance it might come to pass?
John, our original supplier of the BP20422 modules has run out of stock of them and we haven’t been able to find a new supplier (that will let us by less than 100 modules at a time). If you find a module, we can sell you a PCB and the required passives. Let us know!
Hi guys,
I’m trying to do a similar project with this BT HID module but I don’t know what are the keys mapped to the rows and columns.
Do you have any document regarding this?
Thank you!
Hi Seb, I just added the schematic in PNG format to the end of this post. Take a look and hopefully that explains the row/col mapping.